Electronic Design Lab 2023-24 Experiences
30th October 2024 | Jatin Kumar and Piyush Gube
Exploring Project Domains and Electrical Component Requirements in the Electronic Design Lab (EDL)
Electronic Design Lab (EDL) is a six credit core course offered by the Electrical Engineering Department where students are encouraged to integrate concepts from multiple domains to tackle real-world challenges. Common project types include embedded systems, sensor design, control systems, microcontroller-based systems, signal processing, and IoT device development. Students can also explore adjacent fields, such as Machine Learning (ML) and Data Science (DS), provided these projects incorporate significant electrical engineering components.
To align with course requirements, EDL projects must incorporate substantial hardware and electrical components. Engaging with the guiding professor is crucial to ensure that the project meets their expectations. The emphasis should be on creating functional hardware prototypes that involve basic circuitry, including microcontrollers for control and data processing, analog circuit design, and sensor integration. Incorporating fundamental elements like power converters, rectifiers, and PCB design is essential. Practical experience, such as working with breadboard circuits and basic soldering techniques, is also expected to fulfill the course's learning outcomes. Projects that are overly reliant on software without sufficient electrical components may not be approved, so a balanced approach is vital for success in the EDL.
Navigating the Demands of EDL: A Time Commitment Overview
EDL is a highly demanding course that requires significantly more time and effort than the typical 6-credit designation, often akin to an 8-10 credit course. While the workload varies by project and team dynamics, students should anticipate substantial weekly commitments that can exceed the allocated 6 hours.
As the semester progresses, the workload intensifies, especially during project development, testing, and implementation. Initial phases may only require a few hours of literature review, but as deadlines loom, students might need to dedicate 6-8 hours daily. Therefore, taking fewer courses alongside EDL is advisable for effective time management and to ensure sufficient focus on hands-on work and troubleshooting.
Project Work Timings: Flexibility and Access in EDL
Your team will have a designated 3-hour slot in the WEL lab on Monday or Tuesday afternoons. There is also a weekly common lecture on Wednesday afternoons, which requires mandatory attendance for both lab hours and lectures. The lab operates from 10 a.m. to 6 p.m. on weekdays, with specific slots assigned to each group.
Lab access is at the instructor’s discretion outside these official hours. As project deadlines approach, lab hours include weekends and late nights. In the second half of the semester, timings become more flexible, allowing students to work during lunch breaks or other free periods, provided no other labs are scheduled. You can request extended hours through your class representative, particularly as the project nears completion. Effective coordination with your group and lab supervisors is key to maximizing available working time.
Managing Group Conflicts in EDL Projects
Conflicts are common in teamwork, especially around task distribution and decision-making. Uneven contributions can cause frustration, so it's vital to evenly assign tasks and emphasize shared responsibility. To resolve decision-making conflicts, such as choosing between DC and AC power for heating, encourage open discussions and consult with professors when needed. Regular meetings and clear communication are crucial. As deadlines approach, stress may rise, especially during troubleshooting. Taking breaks and addressing conflicts early helps maintain a positive dynamic. Building trust and scheduling regular check-ins can prevent prolonged disputes and keep the team cohesive.
Effective Work Division in EDL Projects
To divide work effectively in your group, start by breaking the project into major subsystems and assigning tasks based on each member’s strengths, such as mechanical design, circuit building, or programming. Clearly defined roles early on help ensure accountability and clarity. Using a Gantt chart to outline timelines and dependencies can streamline planning. Pairing team members on tasks with others reviewing their work promotes collaboration and minimizes errors. Flexibility is essential; some tasks may need adjustments along the way. Foster open communication and regular check-ins to address issues early and encourage teamwork on shared tasks.
Essential Skills for Success in EDL
While no specific skills are required to succeed in EDL, persistence and a strong understanding of electrical engineering concepts from earlier semesters are vital. Regular feedback from professors and lab staff will greatly enhance your learning experience.
Key areas to brush up on include lab work fundamentals, circuit design, simulation tools (like LTSpice), microcontroller programming, and PCB design. Familiarity with software such as KiCad and CAD tools (like Fusion 360) and practical skills in soldering and reading datasheets will also be beneficial. Reviewing these skills beforehand will help you prepare for the course’s hands-on activities.
The Importance of the Project Proposal Phase
The project proposal phase is critical as it defines the direction and scope of your project. Students can either select from a list of projects suggested by professors or propose their own, making sure the problem statement addresses a real-world issue while integrating multiple engineering domains.
A strong problem statement should be specific, measurable, and achievable within the semester’s time constraints. It's beneficial to consult with seniors for insights on feasible projects and set realistic goals based on available resources and skills. When proposing original ideas, ensure your proposal includes clear deliverables, references, and a preliminary solution outline. Collaborating with professors to refine your proposal is essential for its success.
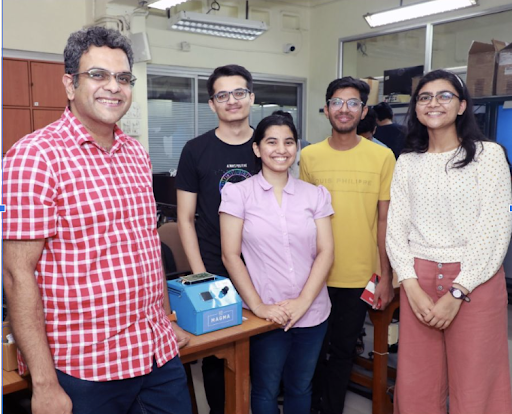
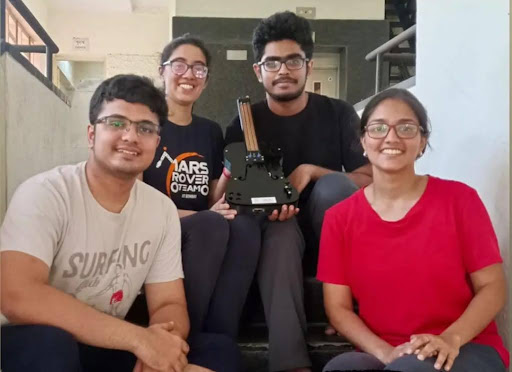
We interviewed some people whose teams won the EDL Best Project award in the 2024 Spring Semester. Here are their insights on how they went about their projects
Reflow hot plate for soldering SMD components -Sahil Rakesh Wani
The primary objective was to design and implement a reflow oven for soldering surface-mount device (SMD) components onto printed circuit boards (PCBs). The final product featured a compact 10cm × 10cm workstation for efficient soldering.
The reflow oven was capable of following custom reflow profiles from various manufacturers. A PCB was created to integrate essential components, including a power supply, temperature sensor, switches, a microcontroller, indicators, a liquid crystal display (LCD), a cooling fan, and a solid-state relay (SSR).
The microcontroller was programmed to control the heating element and indicators, activating the cooling fan when the hot plate reached specific temperatures based on the temperature sensor's input. The external casing was designed using computer-aided design (CAD) and built with 3D printing techniques. This product was developed to be more economical than commercially available options, providing a practical solution for SMD soldering needs.
A Bit of Advice:
Don’t leave your EDL project until the last minute. Aim to have a working prototype early on to focus on refinement and additional features as you approach deadlines. Plan for extra hours toward the end of the semester, and be prepared for a hectic few weeks as submission dates near.
Challenges faced:
Our project-specific challenges were numerous:
- AC and DC power: We explored three heating options—a Nichrome coil with DC heating, a DC heating cartridge, and a ready-made AC hot plate. We faced uniformity issues with the DC cartridge and design complications with the Nichrome coil. Ultimately, we found a solution that worked for our needs.
- Temperature sensors: We struggled with sensor lag, affecting our AC heating control feedback loop. After testing both PT100 and thermocouples, we weighed the pros and cons of each.
- Thermal management and casing:We were unsure about the best structure for thermal management, so we simulated the environment using Ansys/Comsol, learning these tools on the fly.
These challenges were time-consuming but essential for the project's success. Consulting with professors and doing thorough research helped us make informed decisions.
Auto-dialing alarm system for temperature, humidity and energy monitoring, with added smoke detection -Kunj Patel

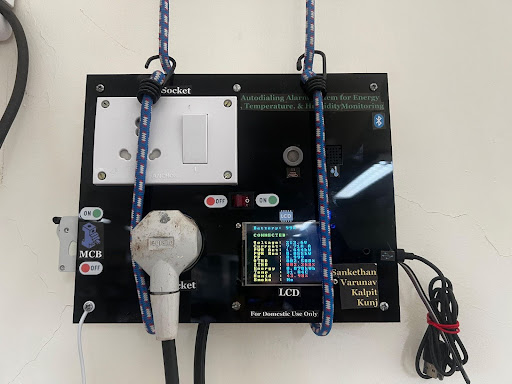
The product was an auto-dialing alarm system for monitoring temperature, humidity, and energy, with added smoke detection. It served domestic households and lab owners by analyzing 11 parameters and providing hazard-specific alarms for safety.
Existing systems lacked parameter-specific alarms and sufficient data logging. This product helped preserve vital lab components by issuing alarms and monitoring electrical issues through data storage on a dashboard. It allowed users to analyze environmental factors and calculate energy consumption in both household and laboratory settings.
The system comprised two modules: a sensor module and a central module. The sensor module had an AC socket, a 16A socket, temperature and humidity sensors, a smoke detector, and an MCB. It gathered data every second and transmitted it to the central module, which logged the data on a local server and sent warning emails upon threshold breaches.
This package was complete and did not require third-party software. It included a miniature UPS for seamless power transition during outages. A user-friendly graphical dashboard offered robust data analysis with customizable thresholds, providing live and historical data access. The modular design allowed the central module to connect to multiple sensor modules to monitor various devices continuously.
A Bit of Advice:
You should be more specific about the exact specifications in the problem statement. This will lead you to choose a less expensive IC, saving significant costs. Apart from that, most other decisions are debatable, but overall, things work out.
All terrain Vehicle with a Robotic Manipulator Arm
-Deep Boliya
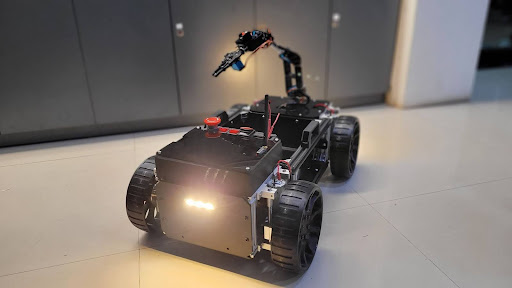
The project was an all-terrain vehicle integrated with a versatile robotic arm, specifically designed for remote operation in challenging environments such as surveillance, industrial inspection, disaster relief, and emergency scenarios for security forces. The vehicle featured a payload compartment capable of carrying up to 10 kg, while the robotic arm was engineered to lift objects weighing up to 500 grams, making it ideal for precise handling and placement tasks. Equipped with a remote control system that included a live video feed, users could operate the vehicle from a distance, even without a direct line of sight. The arm operated in two distinct modes: one for positioning it near objects and another for securely gripping and placing them into the payload compartment. This combination of advanced remote operation and payload capabilities made the vehicle a powerful tool for industries requiring reliable and safe operations in hazardous or inaccessible areas, ensuring versatility and efficiency in real-world applications
A Bit of Advice:
You should be more consistent in your approach. Addressing minor issues early and maintaining a steady pace of work throughout the semester would reduce the pressure toward the end. Additionally, investing time in honing essential skills at the beginning of the course would make tackling more complex problems easier later on.
Electronic Violin
-Maalavika CS
The primary objective was to create a multifunctional electronic violin that would be easier for amateur users. Our final product could be used with speakers or headphones and cover the whole audio spectrum in the frequency range. It may run on a battery or be connected to a standard port. We created a printed circuit board (PCB) utilizing the low-power MSP430F5529IPN microcontroller employed in the violin.
A Bit of Advice:
There should be a desire to learn the necessary tools, such as CAD software and PCB design. Building a strong foundation at the beginning of the course can save time during the more intense phases of the project, reducing stress and avoiding last-minute issues.